Chapter 3
3.4. Authentication & Authorization
Most platforms are more useful when a user is logged in. There is little you can do on Facebook, Twitter, Instagram or Dropbox when you are not logged in. On Twitter, you probably get to look through a couple of public tweets but you won’t be able to tweet, heart or retweet.
When interacting with the platform through an API, it is the same thing. Most times, there is the need to use an API in the context of a user. If I am creating an app that shows the total distance traveled and amount a user has spent on Uber for example, there must be a way to log in the user from the API. This is called user authentication.
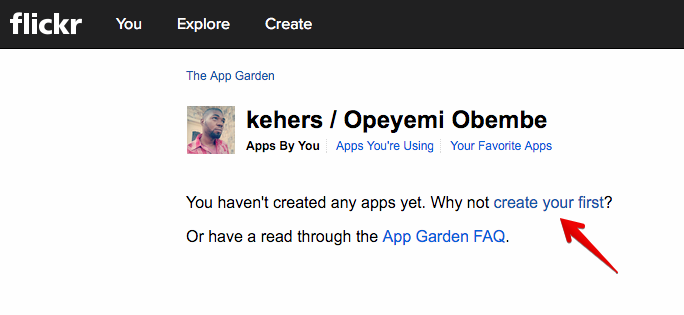
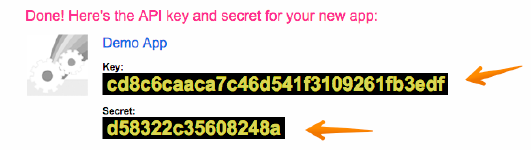
Even when you are not interested in making API calls on behalf of a user or a platform does not offer user related resources, you may still be required to authenticate the client. This is called client authentication. The way this works is you are required to first register your application on the platform. The platform then gives you a set of strings (mostly two) generally called application or API keys. Subsequently, you send these keys along your API requests so that the server can identify the client.

Authentication and Authorization are closely used terms but they have slightly different meanings. Authentication verifies your access to a resource. “Is that username and password even valid for this Twitter login?”
Authorization comes after authentication. It verifies the limits of access to the resource. “Can you only view tweets? Can you send DMs as well?”
There are a couple of ways authentication and authorization is carried out with REST APIs. Here are the most common ones:
1. Request parameter based authentication
This is the simplest method of authentication. User credentials (username/email and password) or client application keys are sent through GET or POST to the API endpoint.
An example is the Infobip1 API. To send an SMS, you just need to send a GET request to:
http://api.infobip.com/api/v3/sendsms/plain
?user=test&password=test&sender=Friend&SMSText=messagetext&GSM=38598514674
Notice how the parameters user and password are passed through the URL query.
Also see how an API key is passed to the Flickr API:
https://api.flickr.com/services/rest/?method=flickr.commons.getInstitutions
&api_key=89961fa5906cf03e55d50e23669c2a42
2. HTTP authentication
HTTP has support for several authentication schemes. The way it works is:
- The client makes an authenticated request to a secure resource
- The server responds with
401 Unauthorizedstatus andWWW-Authenticateheader. The WWW-Authenticate header indicates the authentication schemes and applicable parameters - Based on the authentication scheme, the client constructs and responds with the required credentials
- The server verifies the credentials and allow access to the secure resource
The two most common authentication schemes you will likely come across are Basic Access Authentication and Digest Access Authentication. I will explain how both schemes work but note that you do not have to manually implement any. There are inbuilt functions, libraries or frameworks to take care of this in your preferred web programming language.
Basic Access Authentication
(Plivo2 supports Basic Authentication so we will be using it as an example. I will also be showing requests using cURL so as to introduce you to new flags.)
Here is the flow of the Basic Access Authentication:
-
We (client) send a request.
curl -i https://api.plivo.com/v1/Account/MYZJFMTM/ -
Server responds with a
401 Unauthorizedstatus andWWW-Authenticate: Basicheader.HTTP/1.1 401 UNAUTHORIZED Content-Type: text/html; charset=utf-8 Date: Thu, 08 Oct 2015 00:58:24 GMT Server: nginx/1.6.2 WWW-Authenticate: Basic realm="Login Required" Content-Length: 90 Connection: keep-alive Could not verify your access level for that URL. -
Now that we know a Basic authentication is needed, we construct our credentials and send it back using an
Authorizationheader. The way the credentials is constructed in Basic authentication is to base64 encode the value username:password. So if our username isMYZJFMTMand password isZDcwYTA0ZG, the authorization string will bebase64encode(“MYZJFMTM:ZDcwYTA0ZG”). Our new request will be:curl -H 'Authorization: Basic TVlaSkZNVE06WkRjd1lUQT BaRw==' https://api.plivo.com/v1/Account/MYZJFMTM/ -
The server then responds with access to the resource.
 HTTP/1.1 200 OK
 Content-Type: application/json
 Date: Thu, 08 Oct 2015 01:21:29 GMT
 Server: nginx/1.6.2
 Connection: keep-alive

 {
   "account_type": "standard",
   "billing_mode": "prepaid",
   "cash_credits": "14.29624",
   "timezone": "Africa/Lagos"
 }
One cURL tip here is that instead of having to calculate the base64 encode of username:password, I can use the u flag to directly specify the username and password and let cURL take it from there. In other words, this works perfectly fine for step 3:
 curl -u 'MYZJFMTM:ZDcwYTA0ZG'
 	https://api.plivo.com/v1/Account/MYZJFMTM/
Digest Access Authentication
The Digest Authentication scheme is an improvement on Basic Authentication. Instead of sending a base64 encoded representation of the user credentials that can easily be decoded if intercepted, a hashed value is used instead.
The flow is similar to Basic Authentication. We will use the CloudApp3 API as an example.
-
We send a GET request. The API requires an
application/jsonaccept header, so we include that as well.curl -i -H 'accept: application/json' http://my.cl.ly/account -
CloudApp replies with a
401status andWWW-Authenticate: Digestheader.HTTP/1.1 401 Unauthorized Content-Type: text/plain; charset=utf-8 Content-Length: 28 Server: nginx/1.4.6 (Ubuntu) Status: 401 Unauthorized WWW-Authenticate: Digest realm="Application", qop="auth", algorithm=MD5, nonce="MTQ0NDMyOTA1OTowOTcwOTBhMmU4MGM4OTEyZGY2O GY5NzIyZjMyZTM0MA==", opaque="9eb56ccb2e8b017ae42bdb4739690863" HTTP Digest: Access denied.
It gets a little tricky here but stay with me. First thing you should do is note the returned values in the response. We will be needing them to calculate our response.
realm="Application"
qop="auth" (quality of protection)
algorithm=MD5
nonce8="MTQ0NDMyOTA1OTowOTcwOTBhMmU4MGM4OTEyZGY2OGY5NzIyZjMyZTM0MA=="
opaque="9eb56ccb2e8b017ae42bdb4739690863"

Calculating our response involves three steps.
-
First, we calculate H1. This is the md5 of
username:realm:passwordH1 = md5(kehers@gmail.com:Application:secret) = fc825c89d55aad0a5dda2ba83903ea9eNote that this is only valid if the WWW-Authenticate header in the response does not include an algorithm directive (like with our example response) or if it has a value of “
md5”. If the algorithm directive value is “MD5-sess”,H1becomesmd5(md5(username:realm:password):nonce:cnonce). Cnonce is a client provided nonce4 value. -
Next, we calculate H2. This is the md5 of
HTTP-method:endpointH2 = md5(GET:/account) = ff6ba2065ae532eebf0c813472bc795dThis is only valid if
qopis unspecified or is “auth”. If the value is “auth-int”,H2ismd5(method:endpoint:md5(entity-body)) -
Finally, we calculate our response. Our response is
md5(HA1:nonce:nonce-count:cnonce:qop:HA2). We do not have a nonce-count and cnonce value so this becomesmd5(HA1:nonce:::qop:HA2)response = md5(fc825c89d55aad0a5dda2ba83903ea9e:MTQ0NDMyOTA1OTowOTcwOTBhMmU4MGM4OTEyZGY2OGY5NzIyZjMyZTM0MA==:::auth:ff6ba2065ae532eebf0c813472bc795d) = d38fcc0f22b8f4e6577b62d911214950If
qopis not specified, response ismd5(HA1:nonce:HA2)
Now that we have our response value, we can go ahead and create our Authorization header. Here is what the value looks like:
Digest username="kehers@gmail.com", realm="Application", nonce="MTQ0NDMyOTA1OTowOTcwOTBhMmU4MGM4OTEyZGY2OGY5NzIyZjMyZTM0MA==", uri="/account", qop=auth, nc=, cnonce="", response="d38fcc0f22b8f4e6577b62d911214950", opaque="9eb56ccb2e8b017ae42bdb4739690863"Here is the full request:
curl -H 'accept: application/json' -H 'Authorization: Digest username="kehers@gmail.com", realm="Application", nonce="MTQ0NDMyOTA1OTowOTcwOTBhMmU4MGM4OTEyZGY2OGY5NzIyZjMyZTM0MA==", uri="/account", qop=auth, nc=, cnonce="", response="d38fcc0f22b8f4e6577b62d911214950", opaque="9eb56ccb2e8b017ae42bdb4739690863"' https://api.plivo.com/v1/Account/MYZJFMTM/3. OAuth
OAuth is an open standard for authorization. What makes it interesting is that it does not only provide an authentication layer but authorization as well. What you would have noticed about the other methods are that:
- They only take care of authentication and not authorization. Even though we are allowing access to the API, can this access be scoped out in such a way that the client gets access to just the needed resources and not all resources?
- The user shares his credentials with the client. Is there any way this can be done without the user directly sharing his credentials with the client?
These are challenges OAuth solves. The authorization concept is really straight forward:
- The client redirects the user to a login page on the server
- The user logs in through that login page (not by providing his credentials to the client)
- He is asked if he wants to authorize the client
- (If yes) The server redirects him back to a URL pre-specified by the client with some tokens passed through the URL The client uses these tokens for subsequent calls to parts of the API that require authorization
Technically, it is more complex than that. We will be looking into OAuth in detail in the next chapter. It is that important because nearly all the top players providing data access via API - Facebook, Twitter, Google, Yahoo - use it. Even those with existing authentication schemes, Google and Flickr for example, are deprecating it in favor of OAuth.
-
infobip.com provides mobile messaging solutions. The SMS API documentation is available here: http://dev.infobip.com/v1/docs/getting-started ↩
-
plivo.com provides voice and SMS solutions. The API documentation is available here: https://www.plivo.com/docs/api/ ↩
-
Cloudapp (getcloudapp.com) allows easy sharing of documents, images, audio and video files. The API documentation is available on Github here: https://github.com/cloudapp/api/blob/master/README.md ↩
-
Nonce is a random string used to ensure a request (or action) is done once. ↩